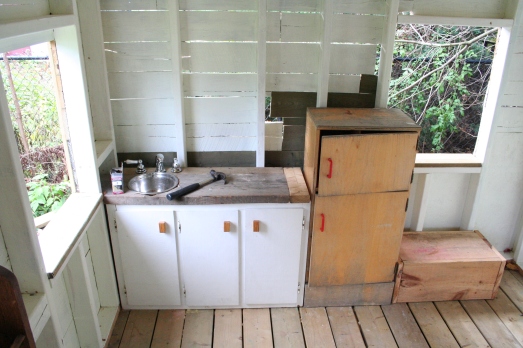
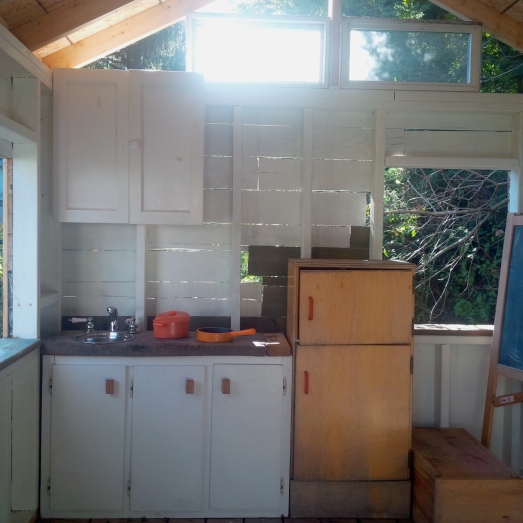
They say the heart of a home is the kitchen. The Missus loves cooking and helping in our real kitchen and then spends much of the rest of her time pretending to be cooking or baking as well. So it made sense that the hideout/playhouse needed a play kitchen. It is a total hack which is either a really good thing proving that anyone can do this using materials that are cheap and easily attainable or it is a bad thing and totally proves Martha Stewart‘s point. Either way, I wanted to share this with those who have generously donated materials for this build and perhaps it will serve as inspiration for those wanting to do the same for their children. And so, without further ado:
I started with an upper cupboard I found for $10 at our local Habitat for Humanity Restore. I chose it because it was fairly skinny in its profile and the doors were the old-fashioned kind. On most modern cupboards the doors cover the entire front of the opening and that would have been problem in terms of opening and closing. So I put the cupboard upside down on the floor (so that the pulls on the doors were at the top) and secured it in place with screws.
 Then I got out the last piece of that seemingly endless board from the garage (that we’ve used for projects in the kitchen and living room already) to make a countertop. I was so excited about doing this project that I didn’t care that I didn’t have the right tools for the job. I happily got out what power tools I had on hand and started working.
 Yeah, you should always use the proper tools. By the end I was a sweaty mess trying to wrestle the wood into place. I made mistakes. But don’t worry I fixed ’em and who cares it is a playhouse right? Right. So not prefect but still “super cool” according to the Missus.
 Do not dwell on the jagged edges of the hole that I created for the sink…like I said I fixed them. I used the drill to drill circles big enough to fit the $5 taps I found at Value Village. I also used the drill to poor effect in making the hole for the sink in the top of the cupboard and the reclaimed board for the countertop (and I used the skill saw and a hammer and I swore…a lot). Oh and also don’t trouble yourself about the unfinished wall behind the cupboards…I’ll get to that later.
 See? The wall is (almost) finished now. I used an old metal bowl for sink and a piece of 2×4 to fix the gap at the end of the counter. I’ll be drawing on some stove top elements with permanent marker at some point and painting the fridge (an old store from the MOD shop a few years ago). Oh and painting the wall…and finishing around the windows…was it me that said she didn’t want to see this project end? Surely not.
 We have plans for kitchen curtains and matching tea towels as well but I’m not sure how they will fare through the winter in such an unprotected playhouse. So we may leave that project for the spring and summer.
So that is our most recent update. What do you think so far?
************UPDATE**************
I found a use for one of the three medicine cabinets from our bathroom upstairs as a nice upper cabinet for the play kitchen.


I cannot believe your kids get to grow up with this – amazing! I would have loved to have something like this.
I guess I was lucky, I had something similar growing up but I didn’t get the say in the design. I’m having a blast trying to figure out more “secret” things to add with the girls…
That is just plain awesome. A kid’s playhouse with a kitchen? Pure awesome.
Parenting high five to you!
Haha! Thanks Becky.
Oh, so much fun! Lucky lucky kids! Can’t wait to see when you do all the decorating touches.
Natalie
XX
Thanks Natalie, I think a lot of the finishing touches will have to wait for spring now..
Great job! It looks so fun, I’m sure there will be many hours spent cooking up grass and leaf stew.
I also love that you found a great use for an old cupboard. To me they are one of those things you want to use somehow, especially if it is not broken, but, you probably wouldn’t use it in your kitchen…you’ve saved it from the landfill. Way to go.
glad you like it Matt…it has been really fun sourcing all of this stuff : )
Lucky kids! This will earn you points for sure that you can use during future teenage arguments!
Hi Kelli! I received the blogging Liebster award this week and part of the fun is passing it on! I have picked 100 Islands Mama as one of my nominations. Read how it works and my questions for you here! Enjoy! http://nicerthannew.com/2013/12/liebster/
Thanks Joan! I am so honoured and excited. I can’t wait to explore your blog and think up some questions to pass along. Cheers, Kelli